
You can create CartoType maps (CTM1 files) from OpenStreetMap data, ESRI shapefiles, SRTM elevation data and other sources using the makemap tool.
Download makemap, the CartoType data conversion tool
You will need the program makemap, which you can download using one of the links below
By using the CartoType makemap tool (makemap.exe, makemap_mac, makemap_linux or any other variant, not necessarily having one of the names listed here), however acquired, you accept the terms of the CartoType Evaluation License and you also accept that neither CartoType Ltd, nor any owners, shareholders or officers of CartoType Ltd, or any other contributors to, authors of or maintainers of the CartoType system, are liable for any damage, direct or consequential, caused by downloading, installing or using the makemap tool, and that the makemap tool is not warranted fit for any particular use and may not be used for any commercial purpose.
The program exists in these versions:
makemap_linux for 64-bit x86 Linux
The current version of makemap was built using CartoType 8.6-116-g32aec8257.
To uninstall the makemap tool, delete the program from your computer.
Creating CTM1 files in older formats
The current version of makemap creates CTM1 files in file version 8.2 only, which can be read only by CartoType releases from 8.0 onward. If you need to create CTM1 files in older CTM1 versions, from 4.2 to 7.1, please use the older version of makemap, now named makemap7: makemap7.exe for Windows, makemap7_mac for the Macintosh, and makemap7_linux for Linux.
Command-line arguments
- you can put command-line arguments in any order
- items starting with / are options (like /project=utme) - but if the first option starts with a hyphen (-), other options must start with a hyphen, leaving you free to use items starting with / for filenames, which is useful on unix-like platforms
- items starting with + are proj4 projection parameters
- other items are input filenames, except for a name ending in .ctm1, which specifies the output file name (which is otherwise inferred from the first input file name)
You can use various data formats. Data formats are inferred from file extensions. Here are the main ones:
- .osm - OpenStreetMap data (and you can use PBF data by piping the output of osmconvert to makemap: see below for details)
- .makemap - rules for importing OSM or SHP data - affects files later on the command line
- .hgt - USGS height data
- .tif (if accompanied by .prj and .tfw files) - georeferenced images
- .png (if accompanied by .prj and .pgw files) - georeferenced images
- XX.txt - a postcode data file from geonames.org; XX is the country code
Data from several data sets can be combined into a single map: just put as many filenames as you like on the command line.
The map data files (CTM1 files) are usable by any version of CartoType.
Automatic options
makemap does as much as possible automatically. For example, if you use this command:
makemap myfile.osm
it will automatically
- use the options /project=m /clip=yes /route=yes /lowreslayers=yes /textindex=full /compress=as /input=coastlines.makemap
- generate the extent of the data from the contents of myfile.osm and clip the coastlines to that extent
- write the output to myfile.ctm1
Large files
Ordinary CTM1 files are limited to 4Gb, but if you need to create a file larger than that (you'll get an error message from makemap telling you if that's necessary) you should use the command-line option /largefile=yes. That option stores internal file positions in 5 bytes instead of 4 bytes, and thus allows files up to 2^40 bytes or 1 terabyte in size.
However, you need a lot of RAM: over 10Gb to create a map of the whole of Germany or France; and makemap may take an hour or two to run. Use a version of makemap built using CartoType 5.12.54 or later because it will use far less RAM (type 'makemap' with no parameters on the command line to print the version).
Here's an example of RAM use and time taken when building a large file. This test was done on 10th May 2020 using a Lenovo W530 Windows computer with 32Gb of RAM.
- source data: OpenStreetMap data for Germany, Austria and Switzerland downloaded on 10th May 2020, USGS height data, and postcode data.
- command line: osmconvert dach-latest.osm.pbf | makemap /largefile=yes /project=laea /urbanareas=yes /extent=5.6,45.7,17.4,55.1 /input=e:\postcodes\at.txt /input=e:\postcodes \ch.txt /input=e:\postcodes\de.txt /input=e:\ctm1\coastlines.makemap /usgs=e:\new-height-data /terrain=height-metres /usgs=e:\new-height-data -.osm /name="Germany, Austria and Switzerland" germany_austria_and_switzerland.ctm1
- time taken: 1h:53m:54s
- peak RAM use: 21Gb.
- size of output CTM1 file: 8.7Gb.
Large files can be used with the Windows, iOS and .NET SDKs but not yet with Android.
PBF data
You can use PBF data as input to makemap by using the osmconvert program to translate it to OSM format. This is the easiest way to use data obtained from Geofabrik, because PBF files are even smaller than OSM files compressed using bzip2. For example, here's a Windows command line to create a map of Britain and Ireland (omitting some command-line options not needed for this example):
osmconvert64 british-isles-latest.osm.pbf | makemap /project=osgb /urbanareas=yes /extent=-15,47,7,63 /input=e:\ctm1\coastlines.makemap -.osm britain_and_ireland.ctm1
A note on the osgb projection: it is the Ordnance Survey of Great Britain projection and doesn't work well outside the British Isles. A good general projection for most countries, apart from extremely large ones, is Lambert Azimuthal Equal Area: /project=laea.
Compressed OSM data
If you have obtained OSM data in compressed form, for example as an .osm.bz2 downloaded from Geofabrik, there is no need to decompress it to a file before using it in makemap. Instead, you can decompress it to standard output using bunzip2, and send it straight to makemap without storing it anywhere. For example, the data for North America takes over 10Gb when compressed, and you probably don't want to decompress it to a file, taking up about 60Gb of hard disk space.
This Windows command line can be used to decompress to standard output and feed that data to makemap (omitting some command-line options not needed for this example):
bunzip2 north-america-latest.osm.bz2 -c | makemap /largefile=yes /extent=-180,0,-40,85 /input=coastlines.makemap -.osm north-america.ctm1
Notes:
- The -c command-line option tells bunzip2 to write to standard output.
- The | ('pipe') operator redirects standard output to be the input to the next command, makemap.
- Using -.osm as an input file name tells makemap to read from standard input.
Use OpenStreetMap data
This method uses data from OpenStreetMap, a organisation that is creating a world-wide street map from data collected by volunteers using GPS devices.
Download OSM files from one of the links here
or you can make OSM files for any area:
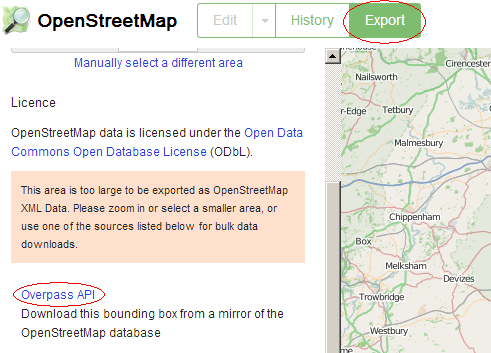
Use the Export button in the main OpenStreetMap map page. Unless the area you want is very small you'll see a message stating that the area is 'too large to be exported as OpenStreetMap XML Data'. In that case, just click on 'Overpass API':
Note: there is a bug (logged as ticket 5169 in the OSM issue tracker) in the script used by OSM for its Overpass query. It can cause lakes and other large polygon areas to be omitted if they overlap the bounds. If that happens (as it will, for example, when exporting greater Stockholm, Sweden), use this query, with your values for the bounds w, s, e and n:
<osm-script timeout="10000" element-limit="1073741824">
   <union into="_">
      <bbox-query into="_" w="17.8" s="59.2" e="18.3" n="59.5"/>
      <recurse from="_" into="_" type="up"/>
      <recurse from="_" into="_" type="down"/>
   </union>
 <print from="_" limit="" order="id"/>
</osm-script>
Paste it directly into the upper query box at http://www.overpass-api.de/query_form.html.
Windows
Use the command
makemap map.osm
or
makemap_x64 map.osm
This will create a .ctm1 file that can be loaded by any of the CartoType demonstration programs. As standard (you can change this using command-line options: see below) it uses the web Mercator projection.
Macintosh
On the Apple Macintosh makemap_mac needs to be run in the 'bash' shell, which can be accessed by opening a terminal window. You need to give the program executable permission before you first use it:
chmod a+x makemap_mac
then run it like this:
./makemap_mac map.osm
This will create a .ctm1 file that can be loaded by any of the CartoType demonstration programs. As standard (you can change this using command-line options: see below) it uses the web Mercator projection.
How to add coastlines to a CTM1 file
The best way is to use coastline data created by Jochen Topf, a member of the OpenStreetMap community.
- Get the coastlines in ESRI shapefile format from https://osmdata.openstreetmap.de/data/land-polygons.html. The best file to use is the one containing complete polygons in WGS84 latitude and longitude format. (Don't use the version which splits large polygons, because the way they are split causes them to leave gaps when used in non-Mercator projections.) Unpack the files and put them in a folder called \coastlines.
- Create a file called coastlines.makemap as follows:
<?xml version="1.0" encoding="UTF-8"?>
<CartoTypeImportRules>
   <file name='..\coastlines\land_polygons.shp'/>
</CartoTypeImportRules>
- Run makemap with these extra options:
/extent=<min-long>,<min-lat>,<max-long>,<max-lat> /clip=yes coastlines.makemap
The longitudes and latitudes for the /extent option should be big enough to enclose all the rest of your map data. The /extent option tells makemap to select only coastlines in that region from the coastline data. If you don't specify an extent, the extent is generated automatically from the bounds of the other map data.
- Use either of the standard style sheets provided by CartoType, or use your own style sheet and provide a style for the 'outline' layer.
If your coastlines.makemap file is in the directory you run makemap in, you don't need to specify it on the command line: makemap will notice that you haven't imported coastlines and import them automatically.
Creating route data
To create standard a-star route data for a map, use /route=yes.
To create low-memory route data to enable routing over large areas on mobile platforms like Android and iOS, using the contraction hierarchy system, use /route=tech. Be warned that creating contraction hierarchy route data can take a long time: up to several hours for a country like Germany.
The TECH (turn-expanded contraction hierarchy) routing system is faster and uses less memory, so it is generally to be preferred unless you need to change the routing profile dynamically, since it supports a fixed set of routing profiles only.
If you need low RAM use at run-time (most iPhones have 4Gb; some iPhone 13 models have 6Gb) but you also need to be able to use arbitrary routing profiles, /route=tc is the best option. It uses much less RAM than a-star. For example an a-star map of the UK has a peak RAM use of about 2.7Gb while the same map with a turn-expanded compact route table has a peak RAM use of about 1.8Gb.
Here is a full list of values for /route:
- a or yes - a-star (reasonably compact, but use /route=t or /route=tc for better routing)
- t - turn-expanded
- tc - turn-expanded, compact (uses far less run-time RAM than a-star or ordinary turn-expanded)
- tech - turn-expanded contraction hierarchy; creates an extra stand-alone ctm1 file with extension .ctm1.tech
- tt{N} - turn-expanded contraction hierarchy, tiled; creates separate maps for each tile; N is the optional tile size in degrees (1,2,4,8, or 16; default=1)
- c or ch - contraction hierarchy (more compact than /tech, but use /route=tech for faster and better routing)
- cs - contraction hierarchy stand-alone; creates an extra ctm1 file with extension .ctm1.cs (more compact than /tech, but use /route=tech for faster and better routing)
- ct{N} - contraction hierarchy, tiled; creates separate maps for each tile; N is the optional tile size in degrees (1,2,4,8, or 16; default=1)
Tiled route data
When you use /route=ct{N} or /route=tt{N}, makemap creates a set of maps with suffixes indicating the south-west corner of each tile.
Example: create tiled maps of the Bedford area of England:
makemap /route=ct /extent=-2,51,1,54 bedford.osm bedford-ct.ctm1
These maps are created:
bedford-ct.ctm1
bedford-ct_N51E000.ctm1
bedford-ct_N51W001.ctm1
bedford-ct_N51W002.ctm1
bedford-ct_N52E000.ctm1
bedford-ct_N52W001.ctm1
bedford-ct_N52W002.ctm1
bedford-ct_N53E000.ctm1
bedford-ct_N53W001.ctm1
bedford-ct_N53W002.ctm1
The first one is an untiled map of the whole area, which can be discarded if not needed. The other maps are one-degree tiles. The latitude and longitude in the suffixes to the file names indicate the south-west corner of the tile. Suffixes have the format _{N|S}{two-digit latitude}{E|W}{three-digit longitude}, followed by 2x2, 4x4, etc., if the tiles are larger than one degree in width or height.
Using tiled route data
You will need CartoType 7.0 or later to use tiled route data. Load any tile when creating the CartoType framework object, then load as many other tiles as needed using LoadMap. You can load and unload maps at any time. Routing will use the tiles that are available. If you load extra tiles and recreate a route, the new route may be different because of the added route data. If CartoType can't create a route because of missing tiles you will get the 'no route connectivity' error (code = 61).
Using a .makemap file to control the conversion from OSM to CTM1 format
You can optionally control the way data is converted from OSM to CTM1 format, and which data is used, and which data is omitted, using an XML file containing rules. By convention such a file has the extension .makemap. You supply its name on the command line, before the names of any osm files it needs to affect, using /input=<rules file name>.
The .makemap rules language is described here.
The standard rules
The standard rules are stored by makemap. You can write them out, so that you can edit them and create a customised version, by using the following command:
makemap /writerules >standard.makemap
Importing SHP data using a .makemap file
You can import SHP data using a .makemap file like this:
<?xml version="1.0" encoding="UTF-8"?>
<CartoTypeImportRules>
 <file name='..\coastlines-complete\land_polygons.shp'>
 <commit layer='outline'/>
 </file>
</CartoTypeImportRules>
See the main documentation for .makemap files for a full explanation of how to convert the fields in each map object to your desired CTM1 attributes.
Using USGS height data (.hgt files) to create terrain
Digital height data can be obtained from more than one source. A convenient one is the United States Geological Survey, which publishes data as tiles for one-degree-square sections of the world in a simple format called HGT. Here is a page describing the data and how you can access it. Other sources are described, reviewed and referenced at ViewFinder Panoramas.
Disclaimer: as with all map data, neither Cartography Ltd nor CartoType Ltd nor any of its officers, directors, employees or sub-contractors take responsibility for or guarantee the copyright status or intellectual property status of this data. It is the user's responsibility to obtain permission for using data.
First download SRTM3 data covering the area you are interested in. The files have names like N00E072.hgt. Don't change the names: makemap uses the filenames to identify the correct data. The names refer to the south-west corner of the one-degree tile. Put all the files in a single directory. In the example below, the directory name is \usgs-height-data.
Then add it to your map using the /usgs command-line parameter in the makemap tool. The format is
/usgs={<extent>,}<directory> - load USGS height data (.hgt) files for the extent from the directory given
and you can specify the extent as either three numbers, giving the OpenStreetMap map tile number in the form zoom, x, y; or four numbers, min-long, min-lat, max-long, max-lat. If you omit the extent, you can specify it earlier on the command line using /extent; if you don't specify it in either place it will be generated automatically from the combined bounds of all the other data except the coastlines.
Other parameters affecting height data are:
/terrain=height-feet|height-metres|shadow - generate height or shadow arrays from height data; affects following files; default is shadow; there are other options but they are not fully supported.
/interval=number - interval between terrain sample points in metres. By default the interval is determined automatically from the data, so there is hardly ever any need to use this parameter. The smaller the interval, the larger the data.
Here is an example showing how to generate a map of Greece with both height in metres and shadows.
makemap /extent=18.74,34.39,29.64,42.19 /usgs=\usgs-height-data /terrain=height-metres /usgs=\usgs-height-data /input=coastlines.makemap greece.osm
Notes on parameters used in the example
/extent=18.74,34.39,29.64,42.19 - set the extent, both for getting coastlines and for terrain. These bounds in lat/long cover the whole of Greece.
/usgs=\usgs-height-data - specify the location of the height data (.HGT) files; this parameter creates a terrain-shadow layer, which is the default
/terrain=height-metres /usgs=\usgs-height-data - these two parameters use a different terrain mode to create a terrain-height-metres layer
/input=coastlines.makemap - load the SHP data for the coastlines (see above)
greece.osm - load the OSM data for Greece
Importing postal codes
Postcodes are automatically imported from OpenStreetMap data by the standard import rules. However, only a few countries like Germany have complete or almost complete coverage of postcodes in their OpenStreetMap data. Therefore it is useful to be able to import postcodes from another source. They can be obtained from the GeoNames site, which has zipfiles with names made from the standard two-letter country code, plus the extension .zip. Thus the postcodes for Austria are in the file AT.zip. This data is available under the creative commons attribution license. Each zipfile contains a file with the extension .txt: e.g., AT.txt, BE.txt, etc.
To import postcode data from one of these files, add it as an input file in the makemap command line. For example, here's a makemap command for Austria:
makemap /project=utme /urbanareas=yes /extent=9.2,46.2,17.8,49.2 /usgs=e:\new-height-data /input=e:\ctm1\coastlines.makemap /input=e:\postcodes\AT.txt austria.osm
The postcodes in a GeoNames file are points, so this data is not quite as useful as the polygon data available for Germany and some other countries, which enables more accurate geocoding; with point data, CartoType has to assume that a place belongs to its nearest postcode point, which is not always true.
GeoNames postcode data is imported into the 'postcode' layer as point objects. The postcode itself becomes the 'pco' attribute, and the place name, if any, associated with the postcode, becomes the label of the object.
Note on GB data. One of the GeoNames files for Great Britain, GB_full.csv.zip, contains the file GB_full.csv. You will need to rename it to GB_full.txt before using it with makemap.
Transliteration and translation
Names using the Cyrillic or Greek alphabets can optionally be transliterated into the Roman script, and Japanese placenames can be translated into their Romaji forms.
For Cyrillic, use /transliterate=ru for Russian, or /transliterate=uk for Ukrainian.
For Greek, use /transliterate=el or /transliterate=yes
For Japanese, download and decompress this dictionary of Japanese names, and put the path of the decompressed file, JMnedict.xml, on the command line. It is a dictionary containig romanised forms of Japanese place names.